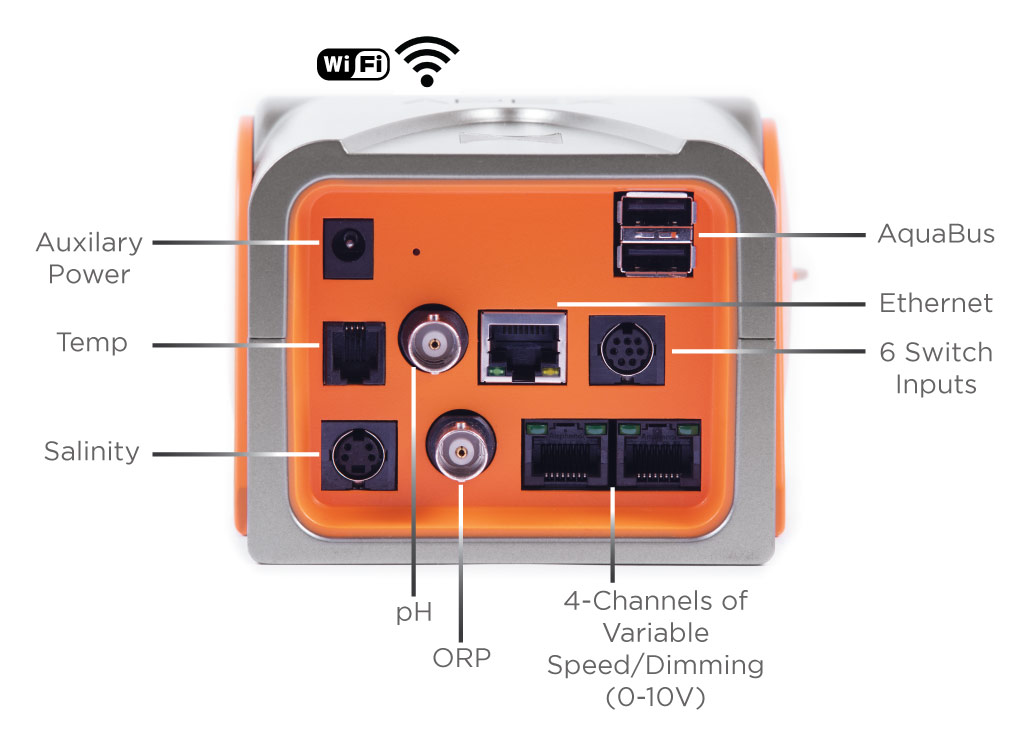
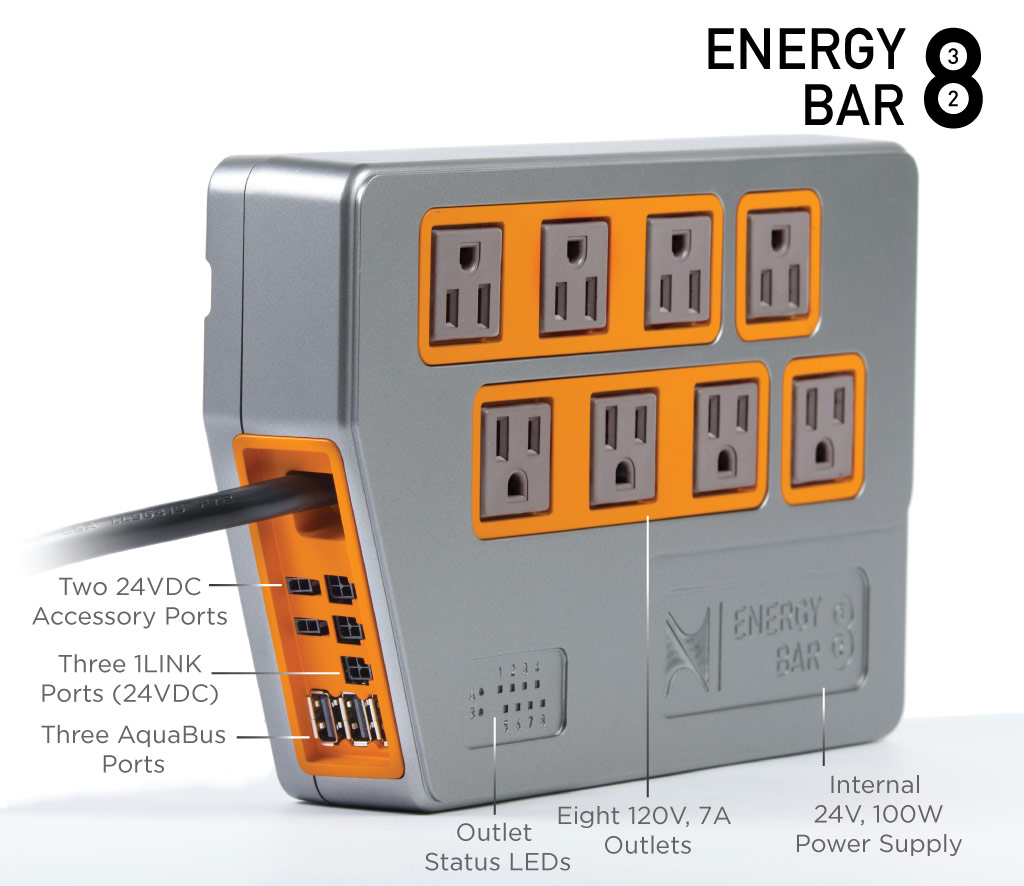
Identifying the Apex and EB832

Throughout this guide there will be images to the left and information about that image to the right.  You can click on any image to expand and better see that image.  We will start off by identifying the different components of your new Apex Base Unit and EB832.

  • To power up the Apex without the use of the EB832
  • 2.1mm tip, 12V input ,0.7A DC output with a center positive electrode (Use Neptune P/N PS12)

AOS 5.03_CA17 or later:

  • To reboot the Apex controller press the button quickly. The Apex status light will go from Orange> Green> Purple> Green> Orange
  • To put the Apex into WiFi access mode press and hold the reset button until the status LED changes to BLUE (about 6 seconds), then release the reset button.
  • To initialize the Apex to factory settings press and hold the button until the status LED turns RED (about 30 seconds), then release the reset button.
  • Supplies 12v power and communication between the Apex and the various modules
  • This is NOT a USB port and will cause damage to any USB device that gets plugged into the AquaBus port and will possibly damage the Apex
  • Monitors the temperature of the tank
  • Measures the pH in the tank
  • Use either double junction lab grade pH probes or the lab grade pH probes
  • BNC style pH probe jack
  • Ethernet cable between the Apex and your router (preferred way)
  • RJ45 Ethernet jack accepts straight through CAT-5 or CAT-6 Ethernet cables
  • You can use both WiFi and Ethernet for redundancy
  • Mini DIN-8 jack for connecting a Breakout Box
  • The Breakout Box (BoB) is used to connect float or any other NO/NC style contact switches
  • Measures conductivity (salinity) of the tank
  • DIN-4 Conductivity port
  • Measures either ORP (oxidation reduction potential) in the water or the pH in the tank/calcium reactor
  • Supports either an ORP probe (Default) or a second pH probe based on how you configure it.
  • BNC style combo jack.
  • (0-10v) controls variable speed pumps or 0-10v dimmable lighting
  • There are (2) RJ45 jacks
  • VarSpd1_I1 & VarSpd2_I2 outputs are in one jack and VarSpd3_I3 & VarSpd4_I4 outputs are in the other jack
  • To control 24V DC equipment less than 30W like our PMUP and other future Neptune products
  • For the DIY you can get the DC24 to Bare wire cable
  • To control up to three 1LINK devices like the WAV pumps or the DOS.
  • Supplies 12v power and communication between the Apex and the various modules
  • This is NOT a USB port and will cause damage to any USB device that gets plugged into the AquaBus port and will possibly damage the Apex.
  • Eight programmable relay outputs
  • Each output can handle up to 7A/840W max
  • All EB832 outputs combined can not exceed 15A/1800W
  • Each LED indicates the ON/OFF of the matching EB832 output
  • An LED will flash if the load on the coresponding output exceeds 7A
  • Supplies power to the 1LINK and 24V DC outputs.

Mounting the Apex Base Unit (ABU)

  • Align the mounting bracket template.
  • Mark the holes and attach the Apex.
Click Here for ABU and EB832 mounting templates

Allow approximately 2-3″ clearance below the ABU for cables

If mounting the Apex into sheetrock or concrete, please use the proper mounting hardware (not supplied)

How to rotate the Apex Base Unit

  • Lightly pull on the tab located on the right side of the mounting bracket.
  • Manually raise or lower the Apex Base Unit.

Do not attempt to remove the bracket.

no-force-bracket-3

Mounting the Energy Bar (EB832)

  • Align the mounting bracket template.
  • Mark the holes and attach the mounting bracket.


Click Here for ABU and EB832 mounting templates

Allow approximately 1″ or more clearance above the EB832 to have the the ability to install and remove the Energy Bar from its mount. Allow 3″ on the left lower corner of the EB832 for connecting AquaBus and other cables. Leave 1-2″ of space for the fan on the right side of the EB832

If mounting the EB832 into sheetrock or concrete, please use the proper mounting hardware (not supplied)

Select your Device

The Apex Fusion interface can be run on any mainstream computer, mobile device and operating system. However, if you happen to have access to an iOS or Android device, we recommend you utilize those, for the most streamlined way to get your Apex up and running. This doesn’t need to be a device you intend using all the time to use your Apex- it is possible to use the Apex Fusion App to setup the system and then use your “everyday device(s)” for normal use.

To continue, please select your device type below:

iOS

iOS (Recommended)

Android

Android (Recommended)