How to connect your Apex through

Connect your Apex to your Router
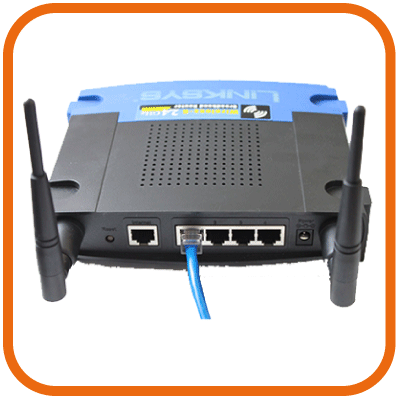
Plug one end of the Ethernet cable into the Apex’s Ethernet port and plug the other end to your router

Confirm your Apex’s Status Light
The Apex status light will change from Blue to Orange several seconds after connecting the Ethernet cable. If it does not then power cycle your Apex Base unit by removing the AquaBus cable from the base unit, then reconnect it.

Sign into the APEX Local dashboard
- Log in to Apex.local
- Default Username is admin
- Default Password is 1234

Recommendation
Hardwired will always be the preferred, most reliable method of connecting your Apex to the Internet.
We all know how redundancy is so valuable in our hobby, so it is recommended to still setup a Wi-Fi connection to your home network. That way if for any reason your cable connection has an issue you can still have access to your controller using a Wi-Fi connection.
To do this, simply unplug the Ethernet cable and click here (or on the image to the left).
Welcome to your APEX Local dashboard
Click the picture to identify the different tiles

1) Dashboard Icons
2) Probe/Input Tiles
3) Output Tiles
4) Switch Inputs
5) 0-10 Var/Speed Tiles
6) Unlock Icon *
7) Apex Time Tile
8) Media Tile
9) Feed Tile
10) Fusion Status Tile
11) Email Alarm Tile
12) 24V ACC Tiles

Hostname Setup
Let’s make your Apex System uniquely yours and give it a name that is appropriate for you and your aquarium. A good example name might be 90SPS, JonsReef, etc. and click below to see how we do that.
1) Click the Configuration icon ![]() to expand to reveal more settings
to expand to reveal more settings
2) Select the Network icon ![]()
3) Select the Advanced tab
4) Select Network in drop down list for the Type field
5) Change the Hostname from apex to any name you want (i.e. 90SPS) with maximum of 15 characters, no spaces and it can only have either dash (-) or underscore (_)
6) Click the orange highlighted cloud Update Apex icon ![]() to save your changes
to save your changes
7) Click the Dashboard icon ![]()
Note: Once you have changed the hostname of the Apex you will now need to login to the APEX Local dashboard by typing this into your browser: http://your hostname here.local
(Here is an example: http://90SPS.local)
* After changing your hostname on your new Apex please reconnect your “classic” Apex back to your network by reconnecting the Ethernet cable.

Link your Apex to APEX Fusion
This will give you access to control your Apex anywhere in the world where there is available Internet/Wi-Fi connection
1) Click the user name (admin) in upper right corner to reveal more settings
2) Select the Link Apex
3a) Sign in to your APEX Fusion account
or
3b) Create a APEX Fusion Account
4) Select orange Link icon ![]()

Notification Alerts
Notifies you by email and/or a SMS message if you have an alarm output on
In APEX Fusion
1) Click the User Name (admin) in upper right corner to reveal more settings
2) Select the Settings
3) Click the Sections ![]() drop down menu
drop down menu
4) Select the Notification
5) Click on the Add Recipient ![]()
6) Select SMS and phone carrier from the Method drop down menu
7) Enter in SMS 10-digit phone number
8) Click on the orange highlighted OK ![]() to save your changes
to save your changes
9) Enter the 4 digit Code (sent to SMS phone number) to confirm notification setup is complete
Note: Recommend to create more then one notification. Repeat steps# 5-9 and select Email or different SMS