

Preparing your Apex for the WAV and 1Link
1. Go to the AquaController Display and on the first main menu select ‘Self Test’
2. Look for the firmware version, it required to be greater than or equal to 4.40. If it reads something less than 4.40, you MUST update the firmware on your Apex before proceeding.


Prepare Magnetic Mount
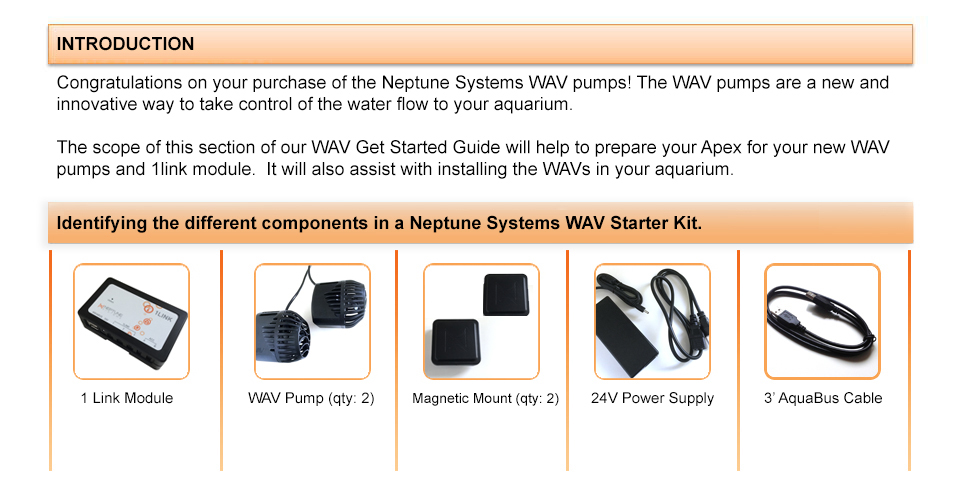
In the WAV Starter Kit there are two magnetic mounts for each of the pumps. The two halves of the mount are separated by spacers. Carefully separate the two haves of the magnetic mount and retain the spacers between the magnets for future use.
The WAV magnets are very strong! The Spacers are very important as these magnets will be very difficult to separate without spacers in between.
Now place the outer mount away from the inner mount for later use.


Inner Magnet Mount
The inner magnet mount for the WAV has a center channel with three round bumps and one rectangular ridge.
Hold the mount in one hand with the rectangular ridge at the bottom.

Connect Inner Mount to WAV Pump
- With your other hand hold the WAV pump with cable at the top
- Starting with the inner magnet below the pump, slide the inner mount upward onto the track on the back-side of the WAV pump
- Continue to slide the inner mount until the inner mount in centered on the pump
- Repeat with 2nd Pump

Install and Mount WAV in your Aquarium
Install the WAV pumps in your aquarium in the desired location. The recommended starting point is the back-left and back-right of your aquarium. After settling on a spot:
- Place the inner mount up against the tank wall
- SLOWLY and CAREFULLY place the outer magnet outside of the tank directly opposite to inner mount.
Note: The outer mount is sealed and submersible and can be placed in an aquarium overflow if applicable.

Angle the WAV Pump
The WAV’s unique mounting system allows the capability to change the direction of flow by up to ~ 40°. To do this:
- Hold the inner mount with one hand
- With the other hand apply pressure down on the WAV pump.

How to Reposition the WAV Pump
After adjusting the angle up/down by 20°, it is possible change the direction of flow by rotating or repositioning the inner magnet. To do this:
- Pull off outer magnet
- Rotate or move pump in desired direction
- Carefully put the outer magnet into place.
Please note that by dragging the mounts across the glass/acrylic may damage or dislodge the O-rings in the WAV mounting system and also may scratch the acrylic/glass.

Mount 1LINK Module
The 1LINK module uses a unique module mounting system.
- Place the bracket on the mounting platform and screw into mounting platform.
- The 1LINK module will then conveniently slide onto the mounting bracket.

Connect the 1LINK Module to the Apex
Connect the supplied 3′ Aquabus cable to either connector on 1LINK. Connect the other end to the aquabus ports on your Energy Bar.
The 1LINK to your system it should now have a green status light.

Power the 1LINK Module
- Connect the Power cord to the 24V power source
- Connect the 24V power supply into a wall outlet- There is no need to connect the power supply to an Energy Bar Outlet
- Connect the the power supply to the 1LINK module

Connect WAV pumps to 1LINK & Update
Connect the WAV pumps to the 1LINK. The tab on the 1LINK connector on the WAV should be pointing up when connecting it to the 1LINK module. By default the pumps will be off when they are connected to the 1LINK.
Next, update your WAV Pumps through the AquaController Display.
![]() Setup
Setup
![]() Module Setup
Module Setup
![]() Update Module
Update Module
The Menu will appear like this. Update the following:
- 1Link
- WAV_#
- WAV_#
It takes about 2 minutes per one to update. Update all your WAV’s. You’re now set!

Conclusion
This completes the physical installation of the WAV Starter Kit. Next, click here to start the WAV | Configuration Guide